Beam sampling
& process monitoring in laser material processing applications
High power lasers
are used in a variety of industrial process, such as cutting, welding
and surface treatment (cladding or transformation hardening) with
different beam profiles needed for these three types of applications.
Monitoring parameters associated either with the laser beam or with the
process itself is fundamental to optimising the operating conditions,
and with customers demanding better performance for more difficult to
process parts, there is a genuine need to move towards closed-loop
control for these processes.
In order to
better understand, and therefore control, the processes it is necessary
to determine which process variables are fundamental to the success of
an operation. In welding applications, for example, there are many
defects that can arise. These include lack of contact, variation of weld
depth, seam discontinuity, cutting, sagged weld and melt splattering.
Not surprisingly, there are a number of variables that need to be
controlled in order to be assured of producing results of satisfactory
quality. These include laser power, beam quality parameter (M2/K/Q
etc.), beam diameter, beam mode, beam pointing stability, shield/assist
gas flow rate, beam focus, material homogeneity and component 'fit-up'.
In order to be able to develop closed-loop control systems, it is
necessary to monitor as many of the variables as possible and not just
the outcome. For example, if the plasma generated in a welding operation
overheats, there is a greater refraction of the laser beam leading to
less energy absorption at the workpiece. This causes the working
"keyhole" to close, resulting in porosity in the welds.
However if the plasma region is inadequately sustained, then there is
cooling at the workpiece that may also lead to porosity. Thus the same
defect can result from different causes. There are two fundamental
issues; the monitoring of the beam itself and the monitoring of the
process. It is also possible to look at ways of monitoring the two
simultaneously.
With laser
powers/energies reaching ever-higher levels it is becoming increasingly
more difficult (and expensive!) to attempt to measure even a small
proportion of the above variables. Most lasers from reputable suppliers
offer (or claim to offer) closed-loop control over laser power etc. and
assure users of the invariate quality of their laser beam. In reality
the situation can often be clouded by confusing specifications. It is
therefore important that beam sampling and process monitoring methods
will utilise relatively inexpensive systems that will allow end-users to
achieve lower failure rates during production and therefore better
productivity and higher profits.
Laser
Sampling Methods
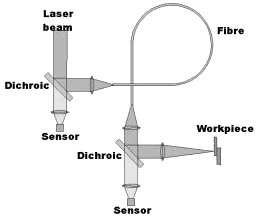
Sampling and monitoring of high power Nd:YAG laser beams is relatively
easy using a 'leaky' fold mirror and an appropriate sensor (a low cost
CCD camera) and can be performed either at the cavity end of the fibre
delivery optics or at the workpiece end of the system, as shown in
Figure 1.

|
Figure 1
|
The
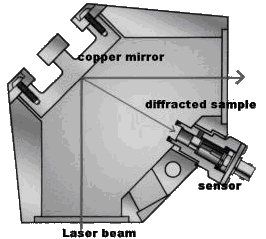
situation with high power CO2 beams was more problematic until the
development by Precision-Optical Engineering of a novel laser beam
sampling system shown in Figure 2. This beam monitor, BM10.6, is based
on the use of single point diamond turning to produce a very weak
diffraction grating on a copper substrate (usually a fold mirror). The
proportion of the beam sampled, and even the angle of the outcoupled
sample can be varied to allow for customising to particular optical
systems. The use of this sampling system does not affect the primary
function of the beam and can be used continuously for beams up to 10 kW
power. It is now also possible to utilise true diffractive optical
elements for the same purpose, and these have the advantage of being
more flexible and can be applied to a greater range of mirror
substrates. At 10.6 microns the monitoring sensor is a key
consideration, but the recent development of a low cost sensor, OCTAVO,
by Laser Point of Italy will be sure to have a dramatic impact upon CO2
beam monitoring. OCTAVO is a multi-segmented thermopile sensor that
provides real time monitoring of the power and diameter of an output
beam from the laser source, the centroid position and the variation in
profile of the intensity distribution. This data can show whether a
malfunction has arisen from a deterioration in the generated beam or
from a problem with the delivery optics. The system has already helped
many industrial users better to schedule their service and maintenance
by thorough logging of the laser beam characteristics in use.

|
Figure 2
|
Process
Monitoring
The radiation emitted by a process is dependent on its temperature.
Radiation is emitted by two mechanisms: energy transitions in the atoms
giving rise to characteristic emission lines, e.g. the blue colour seen
during welding with iron based materials, and black body radiation
giving rise to a broad band background of light, where the intensity at
a given wavelength is dependent on the temperature of the body (by
Plank's equation) and the total energy radiated is proportional to
temperature (Stefan-Boltzmann law) )1). The energy radiated is therefore
a good subject for process monitoring since it is heavily temperature
dependent and the temperature is crucial to the success of the process.
Farson et al at Ohio State (2) have developed a system that uses signals
from several sensors (optical and acoustic) to indicate whether or not a
weld meets certain quality criteria. However the system is currently too
slow (and expensive!) to be used in a production environment due to the
complex multiple signal analysis requirement.
The usual
method of outcoupling process radiation signals is to place a sensor
'off-axis' to the laser beam. This works equally well for both CO2 and
Nd:YAG laser systems however it does have the effect of 'crowding' the
workpiece. Viewing the process radiation off-axis makes careful set-up
important. In both cutting and welding operations, the hottest point of
the process is just below the top surface where the laser beam is
incident on the process leading edge. As the hottest point contributes
most to the radiation emitted and is the first point to undergo a
temperature change should the process start to fail, it is best to
monitor by viewing as close to this region as possible. Unless viewing
directly along the path of the laser beam, viewing will be off-axis and
this means that some of the radiation is effectively masked from the
sensor. For Nd:YAG laser systems this problem can be overcome since the
delivery optics can also be used as collecting optics for the process
radiation which is then outcoupled at a fold mirror with an appropriate
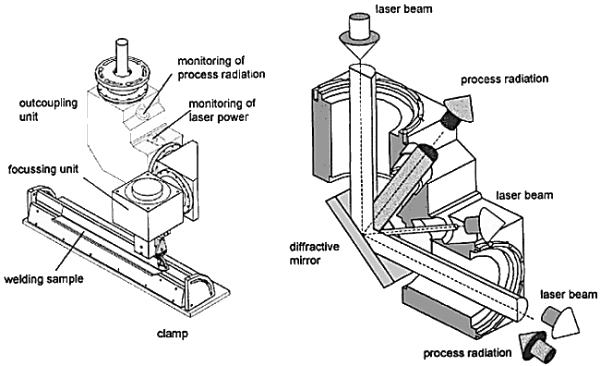
coating. It is also possible to both sample the laser and monitor the
process radiation simultaneously. The diffractive mirror shown in Figure
2 for the sampling of high power CO2 laser beams can also be used to
outcouple process radiation from CO2 laser welding operations. Figure 3
shows schematics of systems under development for the simultaneous
analysis of the beam and the process radiation. Errors currently
detectable by process monitoring systems vary from process to process
(and in some circumstances can even cancel each other out!), but the
more common ones used in industry are:
-
laser
power
-
beam
focus (which with laser power variation leads to power density
changes)
-
workpiece
fit-up
-
processing
speed (feed rate)
-
shield
gas pressure
-
weld
porosity
-
holes/sags
in welds

|
Figure 3
|
Beam
sampling and process monitoring are today being used in a number of
production environments. One example comes from the car roof seam
welding operation in Ford, Cologne where process monitoring is helping
to cut off-line quality assurance and rework. At Philips Components in
Sittard, Netherlands, where 12, 000,000 spot welds are carried out
daily, a system is being used in the manufacturing department to monitor
spot welding of components on TV tube electron guns and has been shown
to be effective in detecting laser power and laser focus variation and
fit-up errors. A third example is in the manufacture of
tailor-welded-blanks for the automotive industry where process
monitoring ensures continuous welds.
In
conclusion it is important to note that whilst the methodology and
hardware are now available to monitor both the laser and the process
itself in real-time, there is still a great deal of work to be done in
understanding the signals obtained and assigning a degree of
significance to their contribution to the overall process which is being
monitored. Until this understanding has been achieved (and the task will
need to be undertaken for each machine tool/process combination) it will
not be possible to fully close-the-loop thereby producing truly flexible
intelligent laser machine tools.
References:
1. Zemansky,
M.W., Dittman, R.H., Heat and thermodynamics, Published by McGraw-Hill
2. Personal
communication.
Authors: Ian
Johnstone, formerly of Precision-Optical Engineering, 42 Wilbury Way,
Hitchin, Herts, UK, SG4 0TP, but now with Armstrong Optical Ltd, 44
Collingwood Road, Eaton Socon, St Neots, Cambs, UK, PE19 8JQ (ianjohnstone@yahoo.com),
and Dr. Karen Williams, Department of Mechanical Engineering,
Loughborough University, Loughborough, Leicestershire, LE11 3TU, UK, (k.williams@lboro.ac.uk)
Press
Enquiries: Denis Bulgin, In Press PR Ltd. PO Box 24, Royston, Herts, UK
SG8 6TT.Tel: 01763 262621 Fax: 01763 262655 E-mail: denis@inpress.co.uk
http://www.inpress.co.uk
This article is also
available on the web pages of Industrial Laser Solutions at: www.ilr.com
|

